

 一个帅得掉渣的段子手
ios 控件设置圆角,避免离屏渲染。
离屏渲染:指gpu(图形处理器)在当前屏幕缓冲区外新开辟一个渲染缓冲区进行工作。这会给我们带来额外的性能损耗,如果这样的操作达到一定数量,会触发缓冲区的频繁合并和上下文的的频繁切换,会出现卡顿、掉帧现象。造成离屏渲染的原因有很多,如:shouldrasterize(光栅化)、mask(遮罩层)、shadows(阴影)、edgeanntialiasing(抗锯齿)、cornerradius(圆角)等等。
下面说一下什么情况下设置圆角会造成离屏渲染:
//设置cornerradius>0且maskstobounds为yes
view.layer.cornerradius = 10.f;
view.layer.maskstobounds = yes;

//设置cornerradius>0且maskstobounds为yes
view.layer.cornerradius = 10.f;
view.cliptobounds = yes;

//像下面设置view.layer.mask
uibezierpath *path = [uibezierpath bezierpathwithroundedrect:imgview.bounds byroundingcorners:uirectcornerallcorners cornerradii:cgsizemake(10.f, 10.f)];
cashapelayer *masklayer = [[cashapelayer alloc] init];
masklayer.frame = view.bounds;
masklayer.path = path.cgpath;
view.layer.mask = masklayer;
上面第一种应该是最常用的,是在设置了圆角及maskstobounds为yes时,才会触发离屏渲染,而maskstobounds默认是no,也就是说只要不设置这个属性就能避免很多情况了,下面说一下如何切一个不触发离屏渲染的圆角:
uiview、uitextfield、uitextview等大部分控件都可以像下面这样设置:
view.layer.cornerradius = 10.f;
view.layer.maskstobounds = no;
有一些特殊情况,uilabel设置时,不要设置label.backgroundcolor,应设置:
label.layer.cornerradius = 10.f;
label.layer.backgroundcolor = [uicolor whitecolor].cgcolor;
有图片的uibutton、uiimageview,用drawinrect绘制uiimage圆角:
uibezierpath *bezierpath = [uibezierpath bezierpathwithroundedrect:rect cornerradius:cornerradius];
uigraphicsbeginimagecontextwithoptions(rect.size, false, [uiscreen mainscreen].scale);
cgcontextaddpath(uigraphicsgetcurrentcontext(), bezierpath.cgpath);
cgcontextclip(uigraphicsgetcurrentcontext());
[self drawinrect:rect];

cgcontextdrawpath(uigraphicsgetcurrentcontext(), kcgpathfillstroke);
uiimage *image = uigraphicsgetimagefromcurrentimagecontext();
uigraphicsendimagecontext();
查看离屏渲染,模拟器可以选中“debug - color off-screen rendered”开启调试,真机可以用instruments检测,“instruments - core animation - debug options - color offscreen-rendered yellow”开启调试,开启后,有离屏渲染的图层会变成高亮的黄色。
写了个离屏渲染的样例:
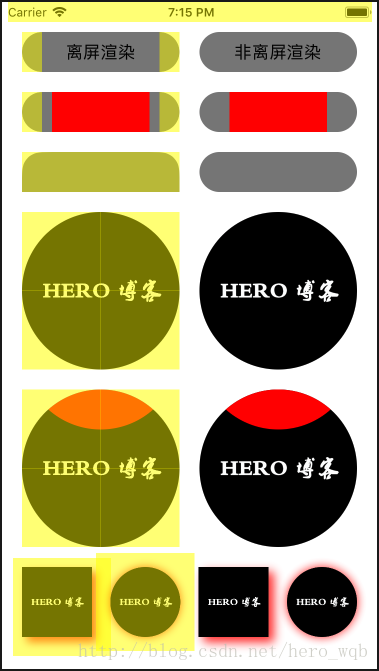
下面贴上代码:
控制器viewcontroller:
#import "viewcontroller.h"
#import "uiimage hwcorner.h"

#define kmainw [uiscreen mainscreen].bounds.size.width

@interface viewcontroller ()

@end

@implementation viewcontroller

- (void)viewdidload {
 [super viewdidload];

 self.view.backgroundcolor = [uicolor whitecolor];

 //创建控件
 [self creatcontrol];
}

- (void)creatcontrol
{
 cgfloat margin = 20.f;
 cgfloat controlw = (kmainw - margin * 3) * 0.5;

 nsarray *titlearray = @[@"离屏渲染", @"非离屏渲染"];
 for (int i = 0; i < titlearray.count; i  ) {
 cgfloat controlx = margin   (controlw   margin) * i;
 //uilabel
 uilabel *label = [[uilabel alloc] initwithframe:cgrectmake(controlx, 30, controlw, 40)];
 label.layer.backgroundcolor = [[uicolor graycolor] cgcolor];
 label.text = titlearray[i];
 label.textalignment = nstextalignmentcenter;
 label.layer.cornerradius = label.bounds.size.height * 0.5;
 label.layer.maskstobounds = i == 0 ? yes : no;
 [self.view addsubview:label];

 //uiview
 uiview *view = [[uiview alloc] initwithframe:cgrectmake(controlx, cgrectgetmaxy(label.frame)   margin, controlw, 40)];
 view.backgroundcolor = [uicolor graycolor];
 view.layer.cornerradius = view.bounds.size.height * 0.5;
 view.layer.maskstobounds = i == 0 ? yes : no;
 [self.view addsubview:view];

 //uiview若未添加子控件,设置view.layer.maskstobounds = yes;也不会造成离屏渲染
 uiview *subview = [[uiview alloc] initwithframe:cgrectmake(30, 0, controlw - 60, 40)];
 subview.backgroundcolor = [uicolor redcolor];
 [view addsubview:subview];

 //uitextview
 uitextview *textview = [[uitextview alloc] initwithframe:cgrectmake(controlx, cgrectgetmaxy(view.frame)   margin, controlw, 40)];
 textview.userinteractionenabled = no;
 textview.backgroundcolor = [uicolor graycolor];
 if (i == 0) {
  /*
  这里换了一种实现方法,用uibezierpath赋值layer.mask,两种方式都会造成离屏渲染
  textview.layer.cornerradius = textview.bounds.size.height * 0.5;
  textview.layer.maskstobounds = yes;
  */
  uibezierpath *path = [uibezierpath bezierpathwithroundedrect:textview.bounds byroundingcorners:uirectcornertopleft | uirectcornertopright cornerradii:cgsizemake(textview.bounds.size.height * 0.5, textview.bounds.size.height * 0.5)];
  cashapelayer *masklayer = [[cashapelayer alloc] init];
  masklayer.frame = textview.bounds;
  masklayer.path = path.cgpath;
  textview.layer.mask = masklayer;
 }else {
  textview.layer.cornerradius = textview.bounds.size.height * 0.5;
  textview.layer.maskstobounds = no;
 }
 [self.view addsubview:textview];

 //uibutton
 uibutton *button = [[uibutton alloc] initwithframe:cgrectmake(controlx, cgrectgetmaxy(textview.frame)   margin, controlw, controlw)];
 if (i == 0) {
  [button setimage:[uiimage imagenamed:@"hero_1"] forstate:uicontrolstatenormal];
  button.layer.cornerradius = button.bounds.size.width * 0.5;
  button.layer.maskstobounds = yes;
 }else {
  [button setimage:[[uiimage imagenamed:@"hero_1"] drawcornerinrect:button.bounds cornerradius:button.bounds.size.width * 0.5] forstate:uicontrolstatenormal];
 }
 [self.view addsubview:button];

 //uiimageview设置圆角
 uiimageview *imageview = [[uiimageview alloc] initwithframe:cgrectmake(controlx, cgrectgetmaxy(button.frame)   margin, controlw, controlw)];
 if (i == 0) {
  [imageview setimage:[uiimage imagenamed:@"hero_1"]];
  imageview.layer.cornerradius = imageview.bounds.size.width * 0.5;
  imageview.layer.maskstobounds = yes;
 }else {
  [imageview setimage:[[uiimage imagenamed:@"hero_1"] drawcornerinrect:imageview.bounds cornerradius:imageview.bounds.size.width * 0.5]];
 }
 [self.view addsubview:imageview];

 //uiimageview若未添加子控件,设置imageview.layer.maskstobounds = yes;也不会造成离屏渲染
 uiview *subimageview = [[uiview alloc] initwithframe:cgrectmake(0, 0, controlw, 40)];
 subimageview.backgroundcolor = [uicolor redcolor];
 subimageview.layer.cornerradius = imageview.bounds.size.width * 0.5;
 [imageview addsubview:subimageview];

 //uiimageview设置阴影
 cgfloat imgw = 70.f;
 cgfloat imgpadding = (kmainw - imgw * 4 - margin * 2) / 3;
 uiimageview *shadowimgview = [[uiimageview alloc] initwithframe:cgrectmake(margin   (imgw   imgpadding) * 2 * i, cgrectgetmaxy(imageview.frame)   margin, imgw, imgw)];
 [shadowimgview setimage:[uiimage imagenamed:@"hero_1"]];
 shadowimgview.layer.shadowcolor = [uicolor redcolor].cgcolor;
 shadowimgview.layer.shadowopacity = 0.8f;
 shadowimgview.layer.shadowoffset = cgsizemake(5, 5);
 shadowimgview.layer.shadowradius = 5.f;
 if (i == 1) {
  uibezierpath *path = [uibezierpath bezierpathwithrect:shadowimgview.bounds];
  shadowimgview.layer.shadowpath = path.cgpath;
 }
 [self.view addsubview:shadowimgview];

 //uiimageview设置阴影 圆角
 uiimageview *shadowcorimgview = [[uiimageview alloc] initwithframe:cgrectmake(margin   imgw   imgpadding   (imgw   imgpadding) * 2 * i, cgrectgetminy(shadowimgview.frame), imgw, imgw)];
 [shadowcorimgview setimage:[[uiimage imagenamed:@"hero_1"] drawcornerinrect:imageview.bounds cornerradius:imageview.bounds.size.width * 0.5]];
 shadowcorimgview.layer.shadowcolor = [uicolor redcolor].cgcolor;
 shadowcorimgview.layer.shadowopacity = 0.8f;
 shadowcorimgview.layer.shadowoffset = cgsizemake(0, 0);
 shadowcorimgview.layer.shadowradius = 5.f;
 if (i == 1) {
  uibezierpath *path = [uibezierpath bezierpathwithroundedrect:shadowcorimgview.bounds cornerradius:shadowcorimgview.bounds.size.height * 0.5];
  shadowcorimgview.layer.shadowpath = path.cgpath;
 }
 [self.view addsubview:shadowcorimgview];
 }
}

@end
uiimage分类,uiimage hwcorner:
#import@interface uiimage (hwcorner) //绘制图片圆角 - (uiimage *)drawcornerinrect:(cgrect)rect cornerradius:(cgfloat)cornerradius; @end /*** ---------------分割线--------------- ***/ #import "uiimage hwcorner.h" @implementation uiimage (hwcorner) //绘制图片圆角 - (uiimage *)drawcornerinrect:(cgrect)rect cornerradius:(cgfloat)cornerradius { uibezierpath *bezierpath = [uibezierpath bezierpathwithroundedrect:rect cornerradius:cornerradius]; uigraphicsbeginimagecontextwithoptions(rect.size, false, [uiscreen mainscreen].scale); cgcontextaddpath(uigraphicsgetcurrentcontext(), bezierpath.cgpath); cgcontextclip(uigraphicsgetcurrentcontext()); [self drawinrect:rect]; cgcontextdrawpath(uigraphicsgetcurrentcontext(), kcgpathfillstroke); uiimage *image = uigraphicsgetimagefromcurrentimagecontext(); uigraphicsendimagecontext(); return image; } @end
最后说一下,只有在大量的离屏渲染情况时才会出现卡顿、掉帧等现象,没必要过分追求容不下一丝黄色。性能上instruments工具还可以检测很多。
以上就是本文的全部内容,希望对大家的学习有所帮助,
