尤大的 vue3.0 已经发布有一阵子了, 已经很成熟了。今天想起来,是时候该上手体验一波了。
vue3中文文档 - vuejs
vue3.0 亮点
- performance:性能更比vue 2.0强;
- tree shaking support:可以将无用模块“剪辑”,仅打包需要的;
- composition api:组合式api;
- fragment, teleport, suspense:“碎片”,teleport 即 protal 传送门,“悬念”;
- better typescript support:更优秀的ts支持;
- custom renderer api:暴露了自定义渲染api;
vue3.0 项目初始化
1. 安装 vue-cli 脚手架
$ npm install -g @vue/cli
安装成功后,使用 vue -v 命令,查看是否安装成功:
$ vue -v
@vue/cli 4.5.9
如果没有安装成功或者是还是2.0版本的,那么我们要将他升级到 3.0。
先将已有的 vue-cli 卸载,然后重新安装即可。
$ npm uninstall vue-cli -g
2. 创建 vue3.0 项目
$ vue create vue3-demo
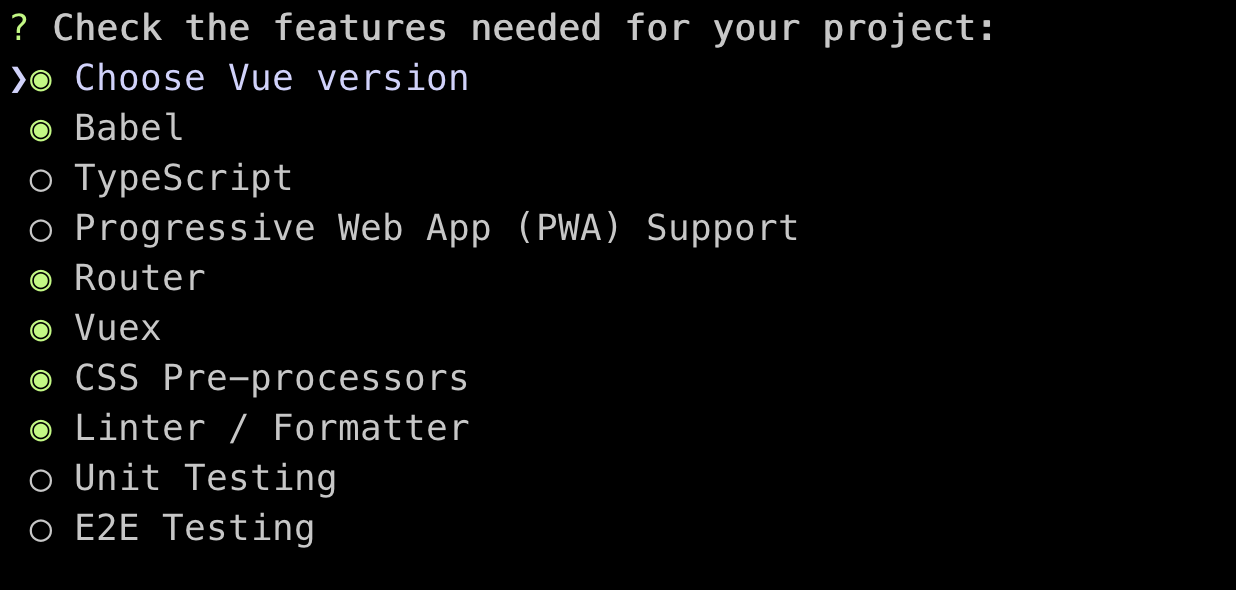
在出现的命令交互窗口选择 manually select features:
然后勾选:router、vuex、css pre-processors 和 linter / formatter等内容。
回车后根据自己的习惯选择好,就开始创建项目。

选择vue版本:

安装完成之后就可以直接创建 vue3.0 的项目了,通过命令进行后续操作了。
通过下面两个命令就可以启动 vue3.0 的项目了。
 $ cd vue3-demo
 $ npm run serve
成功运行项目:

下面就开始干我们的正事了。。。
vue3.0 新特性
1. 创建实例
在 vue3 中每个 vue 应用都是通过用 createapp 函数创建一个新的实例,不在通过 new 的方式进行创建:
vue3创建实例的方式:
// src/main.js
import { createapp } from 'vue'
import app from './app.vue'
import router from './router'
import store from './store'
createapp(app).use(store).use(router).mount('#app')
vue2 通过函数式创建实例:、
new vue({
  el: '#app',
  router,
  store,
  render: h => h(app)
})
2. 创建路由
现在创建路由实例需要手动引入 createrouter 方法,创建 history 模式路由也需要手动引入 createwebhistory 方法,这达到 tree-shaking 的目的,即不会把所有的 api 都打包进来,只会打包你用到的 api,vue3 将都会使用这种形式。
import { createrouter, createwebhistory } from 'vue-router'
import home from '../views/home.vue'
const routes = [
  {
    path: '/',
    name: 'home',
    component: home
  },
  {
    path: '/about',
    name: 'about',
    // route level code-splitting
    // this generates a separate chunk (about.[hash].js) for this route
    // which is lazy-loaded when the route is visited.
    component: () => import(/* webpackchunkname: "about" */ '../views/about.vue')
  }
]
const router = createrouter({
  history: createwebhistory(process.env.base_url),
  routes
})
export default router
3. 响应式数据和事件绑定
vue 3.0 中初始化状态通过 setup() 方法,定义状态需要调用 ref() 方法。
这就跟在 vue2 中有很大的不同,vue2 中我们是使用选项的方式来创建 data、methods、watch 和 computed 的。
<template>
  <div>
      {{count}}
      {{str}}
      <button @click="add">add</button>
  </div>
</template>
<script>
import { ref } from 'vue';
export default {
    setup() {
        const count = ref(0); // 声明count,初始值为 0
        const str = ref('hello'); // 声明str,初始值为 'hello'
        const add = () => {	// 定义一个事件,用来更新count状态
            count.value ;	// 更新count值的时候不能直接使用count  ,而应使用 count.value
        }
        return {
            count,
            str,
            add
        }
    },
}
</script>
4. 使用 reactive 声明响应式数据
使用 reactive 来一次声明多个变量
import { reactive } from 'vue'
export default {
  setup () {
    // 引入 reactive,同时定义多个变量
    const state = reactive({
      count: 0,
      str: 'hello'
    })

    // 现在访问变量,不能使用 .value 方式访问了
    const add = () => {
      // state.count.value   // 错误
      state.count
    }

    return {
      state,
      add
    }
  }
}
reactive 和 ref 比较
-
reactive是接收一个普通对象,返回该对象的响应式代理,它等同于 2.x 中的vue.observable()。const obj = reactive({ count: 0 }) // obj 此时是一个响应式的对象 // 访问或修改,直接基于 obj.count -
ref也是接收一个参数并返回一个响应式且可改变的ref对象,一般参数是基础类型。
如果传入的参数是一个对象,将会调用 reactive 方法进行深层响应转换。ref 对象拥有一个指向内部值的单一属性 .value,即当你要访问它的值时,需要 .value 拿到它的值。但是如果是在 setup 中返回且用到模板中时,在 {{}} 里不需要加 .value 访问,在返回时已经自动解套。setup() { return { count: ref(0), // 这里返回,在模板中无需 .value 访问值 } },
5. watch 和 computed
在 vue3 中使用监听器和计算属性,也需要手动引入,且 watch 和 computed 都需要在 setup 中进行。
import { ref, watch, computed } from 'vue';
export default {
    setup() {
        const count = ref(0);
        const add = () => {
            count.value ;
        }

        // 监听器 watch 同样是一个方法,它包含 2 个参数,2 个参数都是 function
        // 第一个参数是监听的值,count.value 表示当 count.value 发生变化就会触发监听器的回调函数,即第二个参数,第二个参数可以执行监听时候的回调
        watch(
	      () => count.value,
	      (val, oldval) => {
	        console.log(`new count: ${val},old count: ${oldval}`);
	      }
	    );

	    // 计算属性 computed 是一个方法,里面需要包含一个回调函数,当我们访问计算属性返回结果时,会自动获取回调函数的值:
	    const doublecount = computed(() => {
	      return count.value * 2;
	    });
        return {
            count,
            add,
            doublecount
        }
    },
}
如果是 2 个以上的监听属性:
watch(
  [refa, () => refb.value],
  ([a, b], [preva, prevb]) => {
    console.log(`a is: ${a}`)
    console.log(`b is: ${b}`)
  }
)
6. 获取路由信息
vue3.0 中使用 getcurrentinstance 方法获取当前组件实例,然后通过 ctx 属性获取当前上下文,ctx.$router 是路由实例,而 ctx.$router.currentroute 就包含当前路由信息。
import { getcurrentinstance } from 'vue'
export default {
  setup () {
    const { ctx } = getcurrentinstance()
    console.log(ctx.$router.currentroute.value)
  }
}
7. vuex
在学习 vue3 的 vuex 4 之前,先来看一下 vue2 的 vuex 3:
可以发现创建 store 实例的方式改变了,vue2 中是使用 new 的方式进行创建的
export default new vuex.store({
   // ...
})
看完 vue2 的 vuex 3,那么继续回到我们 vue3 的使用。
-
定义 vuex 状态
在
state中创建了一个状态,在mutations中添加修改该状态的方法,在actions中提交mutation的方法,而不是直接变更状态。import { createstore } from 'vuex' export default createstore({ state: { count: 0 }, mutations: { add(state) { state.count; } }, actions: { add({ commit }){ commit('add') } }, modules: { } }) -
更新 vuex 状态
方式一:
在 xx.vue 页面中,通过计算属性使用vuex状态;
在具体事件中通过store.dispatch方法触发 action。<template> <div> <div>state from vuex {{count}}</div> <button @click="add">add</button> </div> </template> <script> import { computed } from "vue"; import { usestore } from 'vuex'; // 引入 usestore 方法返回 store 实例 export default { setup() { const store = usestore() const count = computed(() => store.state.count) const add = () => { store.dispatch('add') } return { count, add, }; }, }; </script>方式二:
通过获取当前组件实例ctx,使用ctx.$store.commit直接分发mutations,但是mutation有个限制:必须同步执行,而action就不受约束,可以在action内部执行异步操作。<template> <div> <div>state from vuex {{count}}</div> <button @click="add">add</button> </div> </template> <script> import { computed, getcurrentinstance } from "vue"; export default { setup() { const { ctx } = getcurrentinstance() const count = computed(() => ctx.$store.state.count) const add = () => { ctx.$store.commit('add') } return { count, add, }; }, }; </script>
值得注意的新特性:
vue 3 中需要关注的一些新功能包括:
- 组合式 api
- teleport
- 片段
- 触发组件选项
- createrenderer api 来自 @vue/runtime-core 创建自定义渲染器
- 单文件组件组合式 api 语法糖 (


 牙白的秘密
牙白的秘密
